
- Step 1: Set Up Your Receptionist
- Step 2: Access Webhook Settings
- Step 3: Add GoHighLevel Inbound Webhook
- Step 4: Copy the Webhook URL
- Step 5: Test the Receptionist's Call
- Step 6: View Webhook Responses in GoHighLevel
- Step 7: Map Data and Automate Actions
- Step 8: Updating Contact Information
- Step 9: Customize Data Points and Automation
- Step 10: Finalize and Store Data
- Conclusion
In this article, we’ll walk you through the process of sending data from a receptionist system to GoHighLevel using an inbound webhook. These steps also apply to HubSpot if you’re using Zapier, but for this tutorial, we will focus on GoHighLevel. By following this guide, you’ll be able to collect data during receptionist calls and trigger automation in GoHighLevel based on the data collected.
Step 1: Set Up Your Receptionist #
Before setting up the webhook, you’ll need to configure your receptionist system. Follow these steps to get started:
- Add Your Stages: Make sure your receptionist stages are set up correctly. Stages represent different points in the conversation (such as greeting, appointment scheduling, etc.), which allow the system to collect data throughout the call.
- Update Company Info (if needed): Review and update any company details, like your company name or the services you offer, in the receptionist settings.
Once everything is set, save your receptionist configuration. 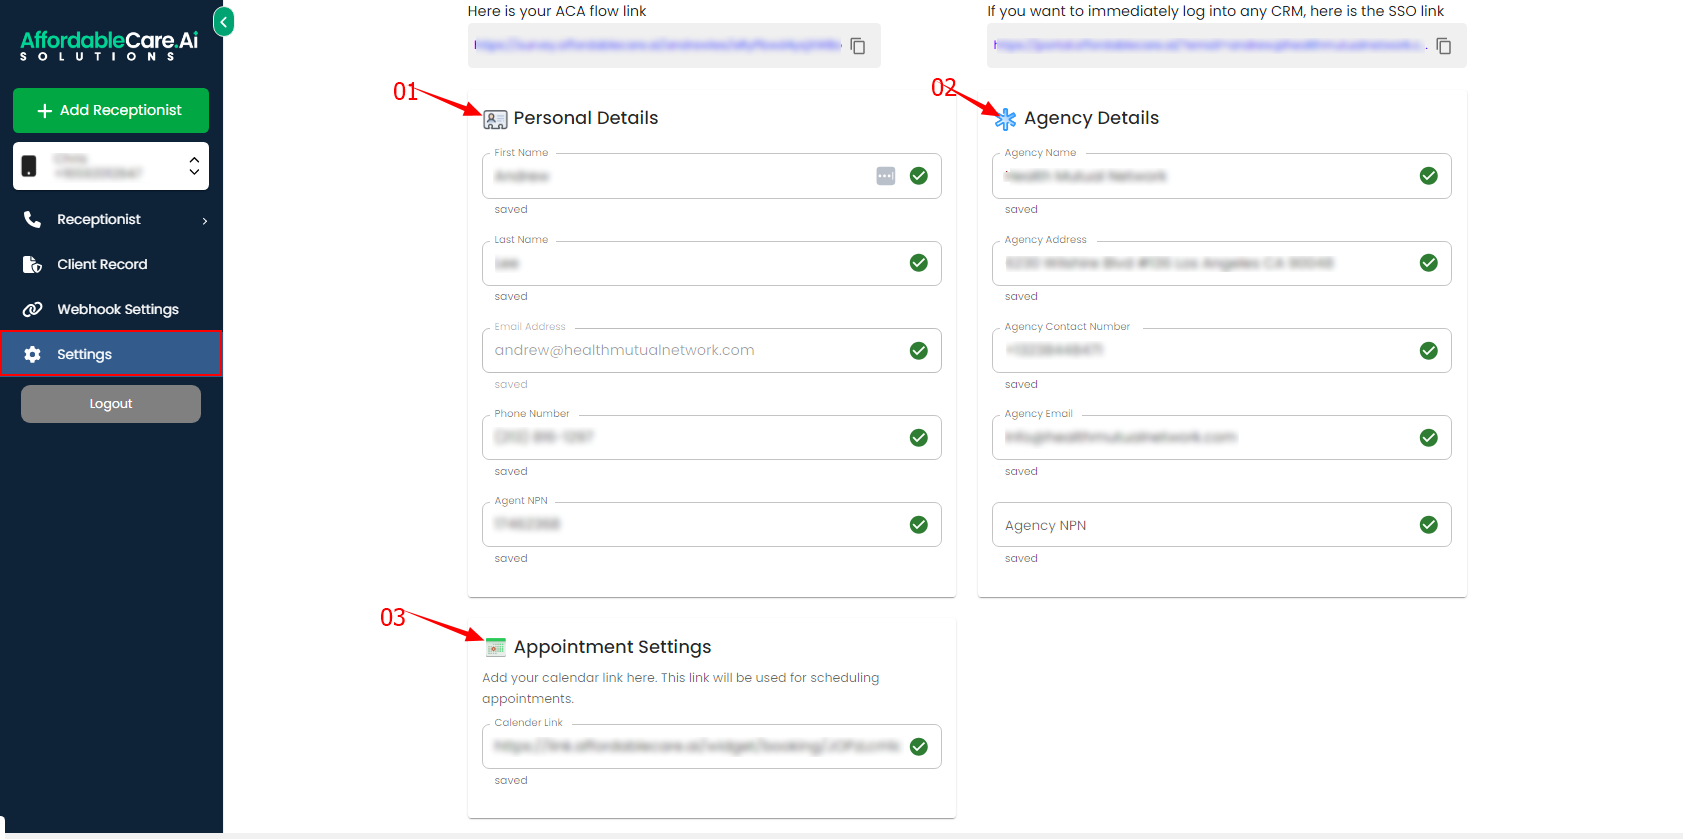
Step 2: Access Webhook Settings #
Now that your receptionist is configured:
- Navigate to the Webhook Settings in your receptionist system.
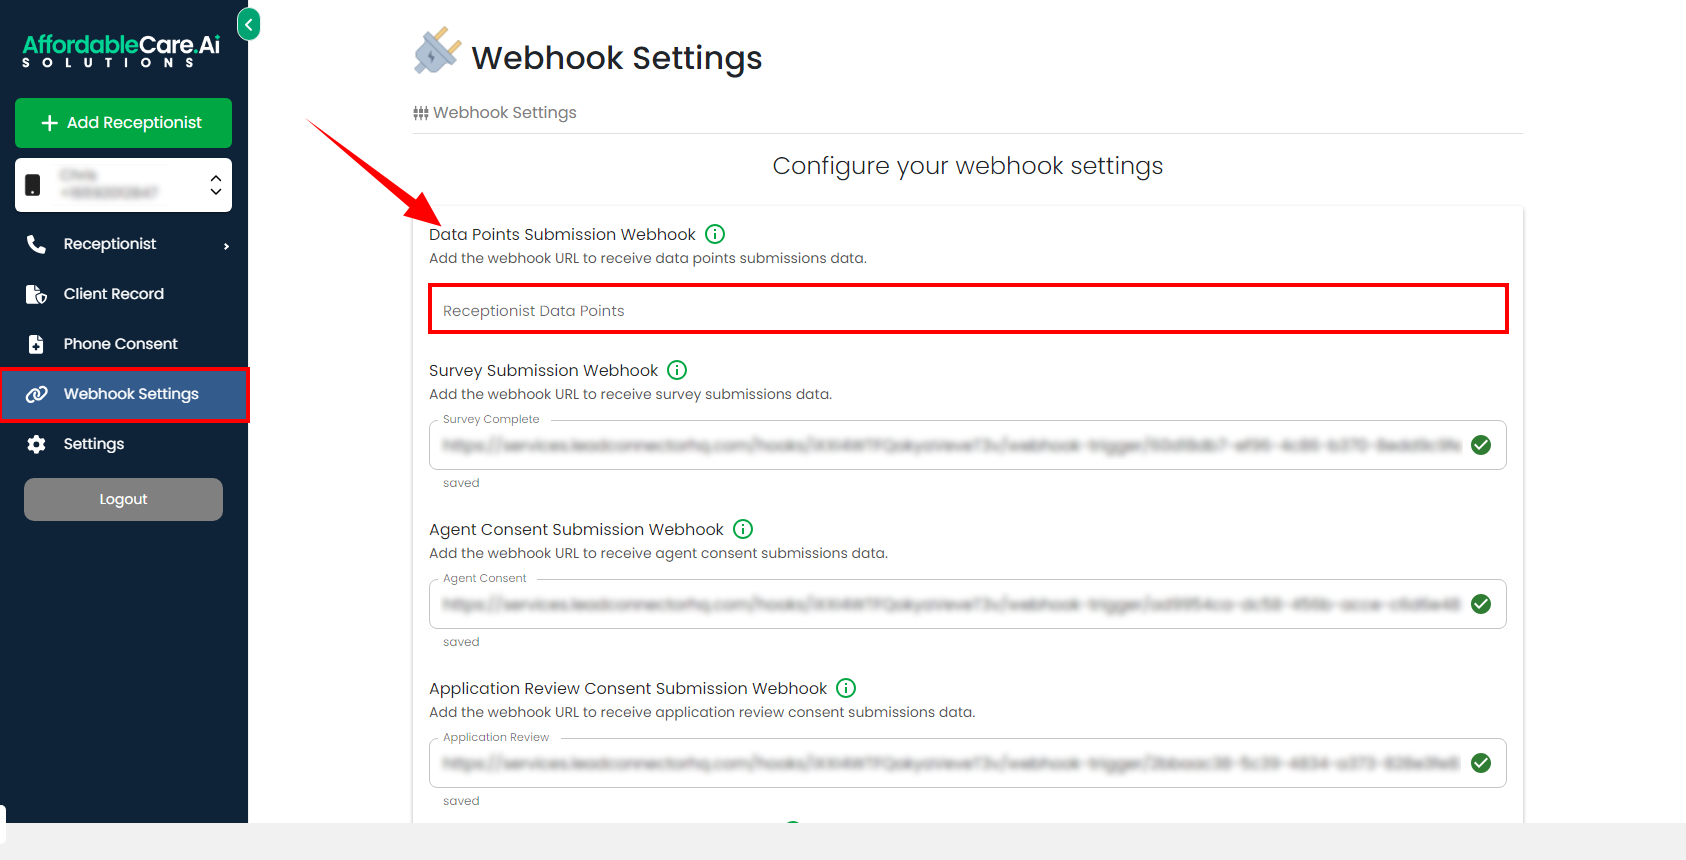
- You’ll need to add a GoHighLevel inbound webhook, which will allow data from your receptionist to be sent to GoHighLevel.
Step 3: Add GoHighLevel Inbound Webhook #
To integrate with GoHighLevel:
- Go to Automation Settings in GoHighLevel.
- Look for the option to create an Inbound Webhook.
- GoHighLevel will generate a Webhook URL for you.
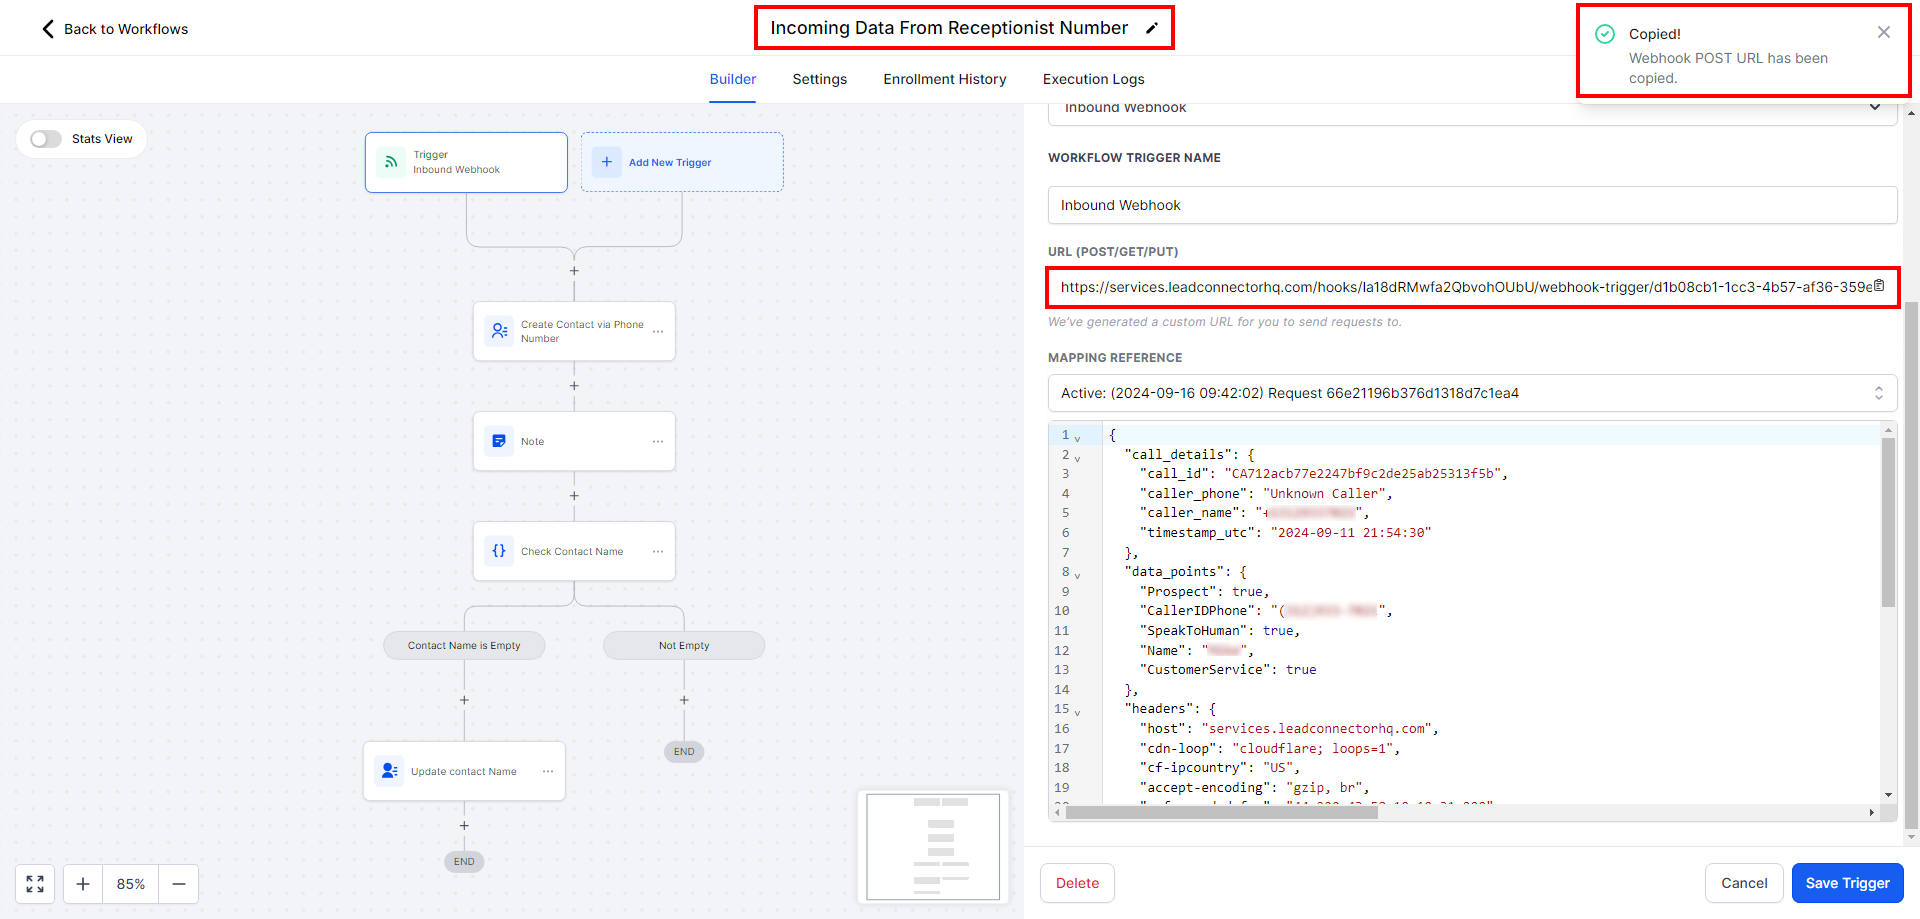
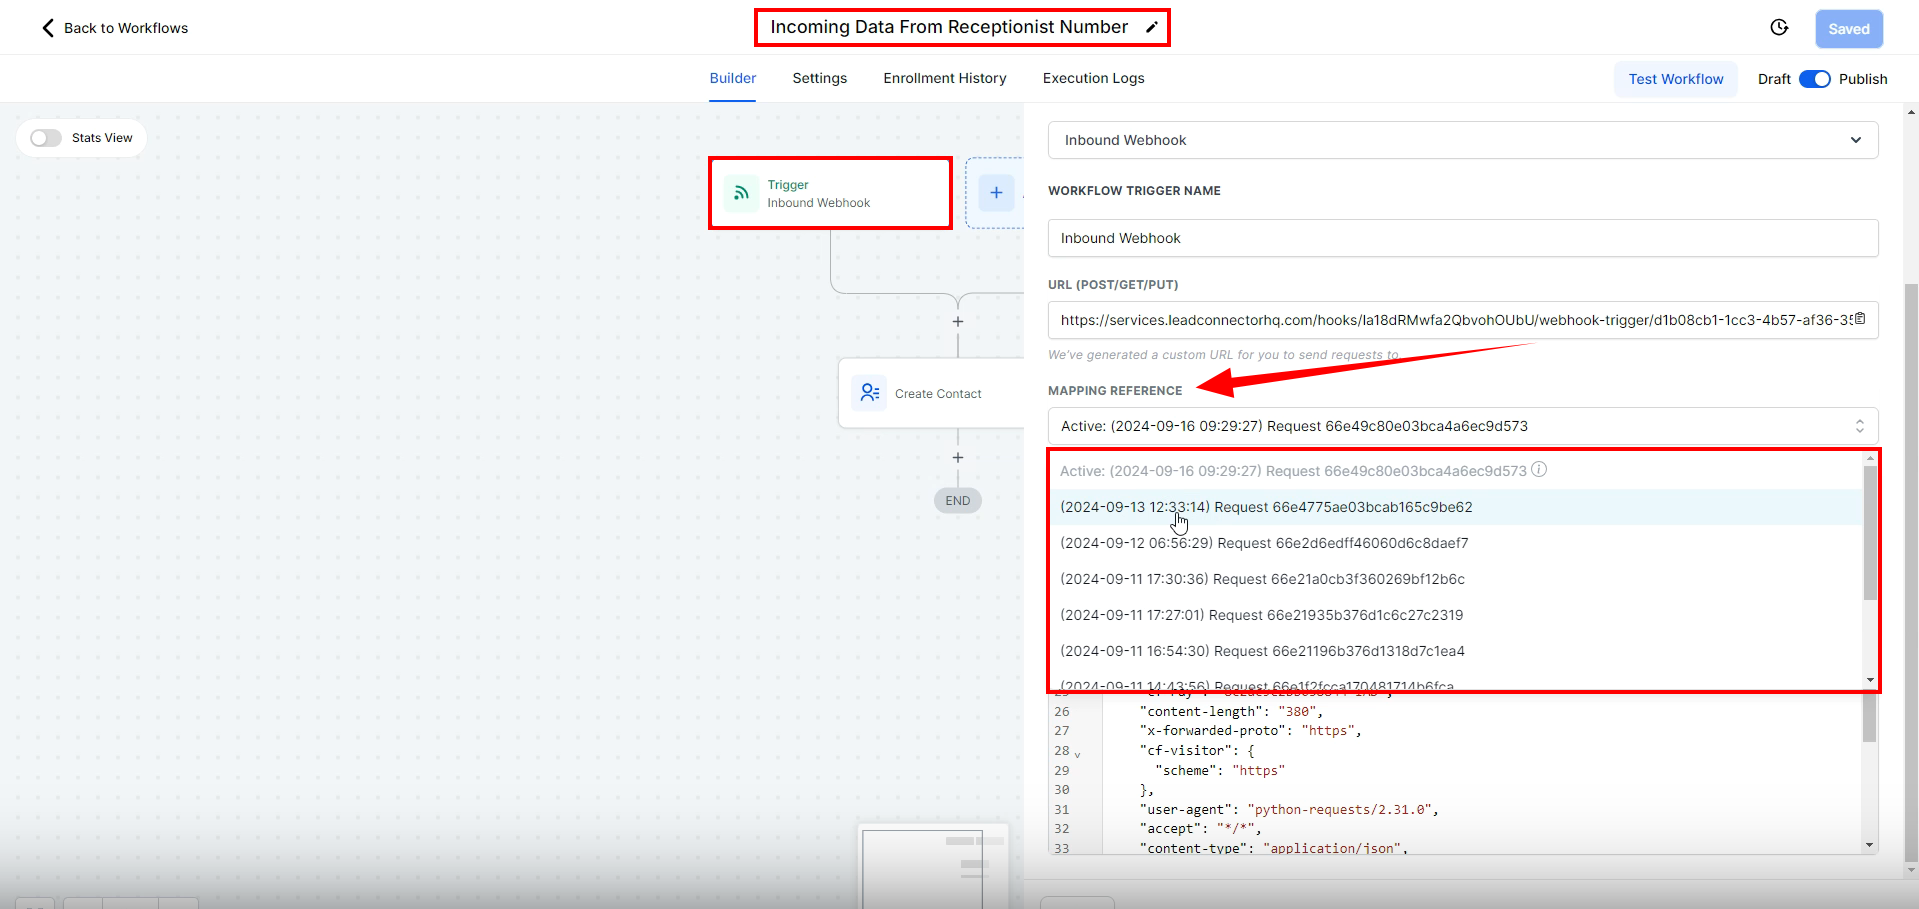
Step 4: Copy the Webhook URL #
Once GoHighLevel provides the URL for the inbound webhook:
- Copy the Webhook URL.
- Return to your receptionist system and paste the URL in the designated field for the Data Point Submission Webhook.
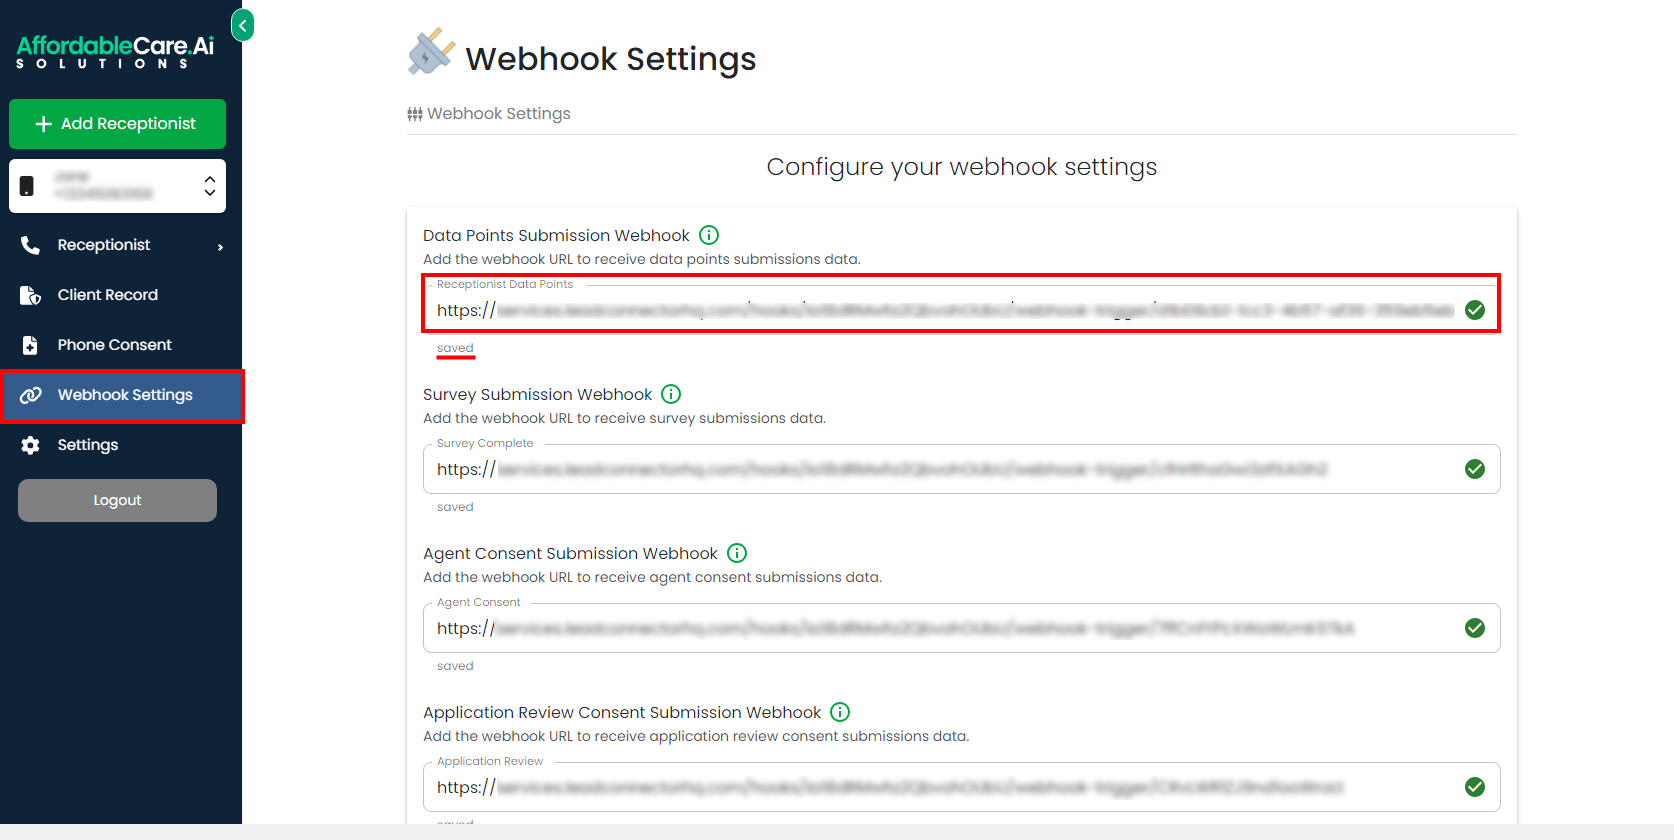 This is the connection point where the data collected by the receptionist will be sent to GoHighLevel. After pasting the Webhook URL:
- The system will automatically save the webhook.
- You should see a confirmation message that says “Saved.”
Next, it’s time to test the connection by making a call through the receptionist.
Step 5: Test the Receptionist’s Call #
To verify the setup:
- Dial the receptionist’s phone number you set up.
- Have a brief conversation or make an appointment. During the call, the system will begin collecting various data points like caller ID, phone number, and potentially other information depending on the stage of the call.
 As the call progresses, data points such as the caller’s name, phone number, and other relevant details will be captured by the receptionist system. These data points will be sent through the webhook to GoHighLevel, where they can be used to trigger automation.
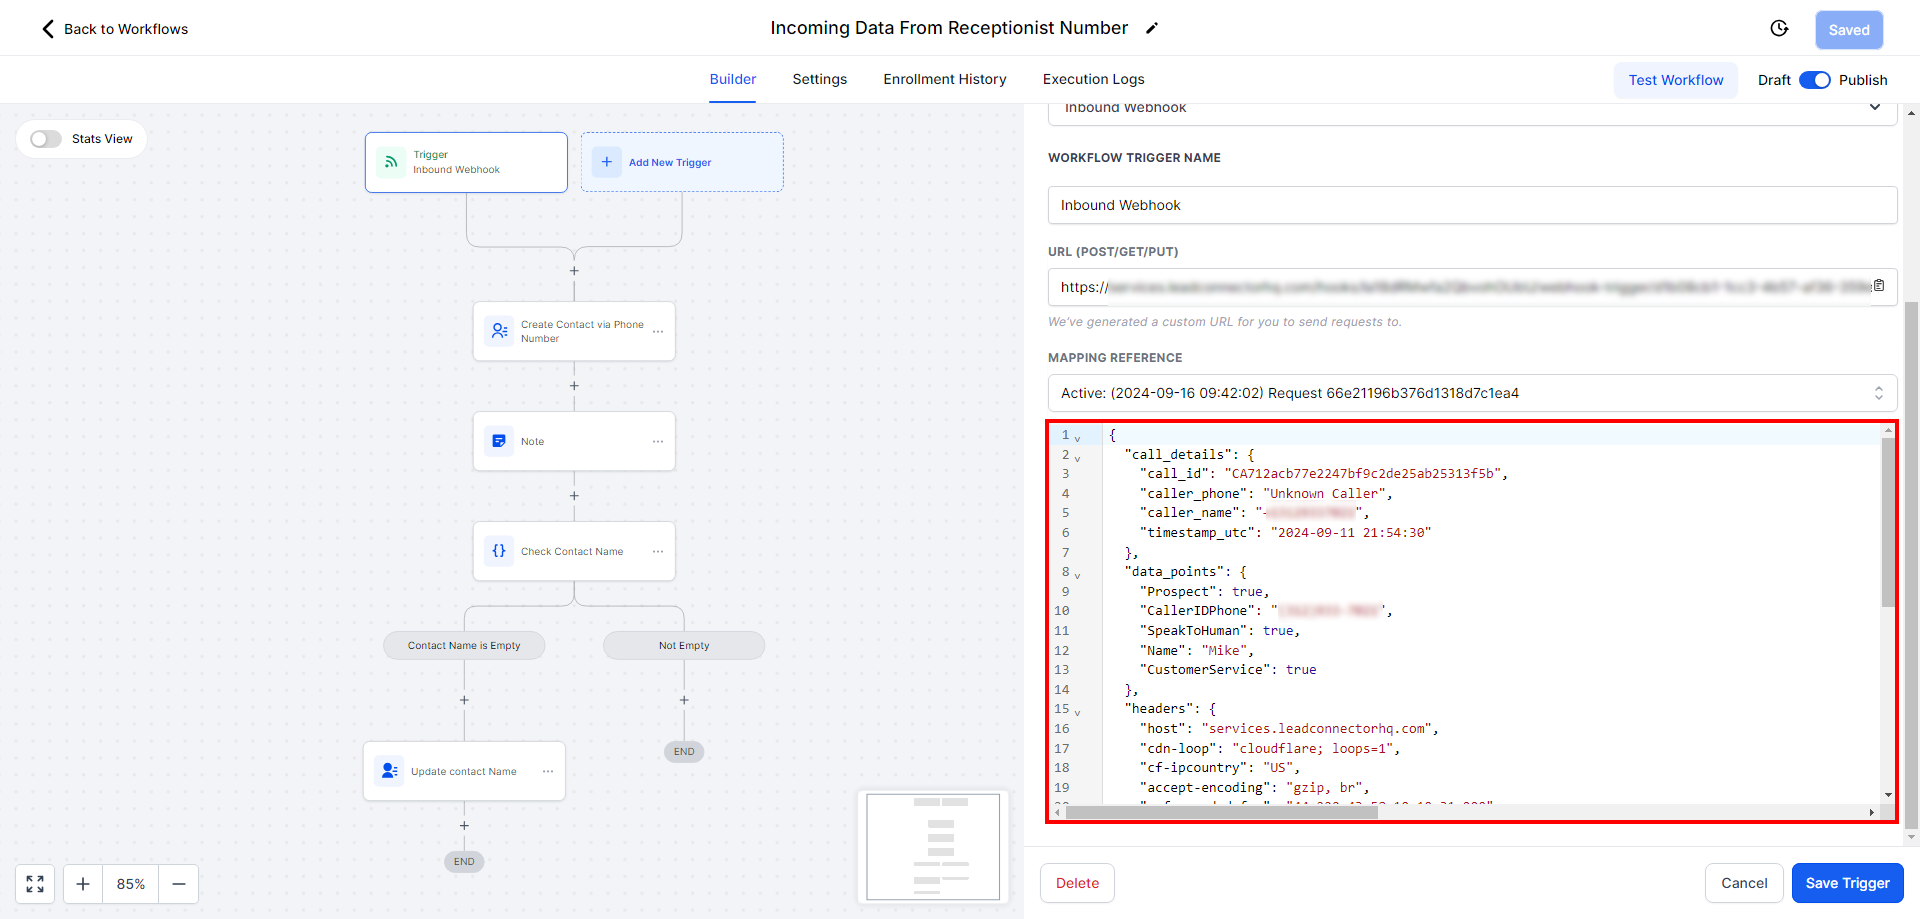
Step 6: View Webhook Responses in GoHighLevel #
Once the call is completed:
- Log in to GoHighLevel and navigate to the Webhook Responses section.
- Select the latest response based on the date and time of the call.
 Here, you’ll be able to see the data points collected from the receptionist’s call.
Step 7: Map Data and Automate Actions #
Now that you have the data, you can:
- Store the collected data in variables or fields in GoHighLevel.
- Create automation based on these data points. For example, you can set automation to create contacts or send follow-up emails based on the collected information.
Example: If a caller provided their phone number and Medicare details, you could set automation to create a new contact with those details and trigger an email with additional Medicare plan information.
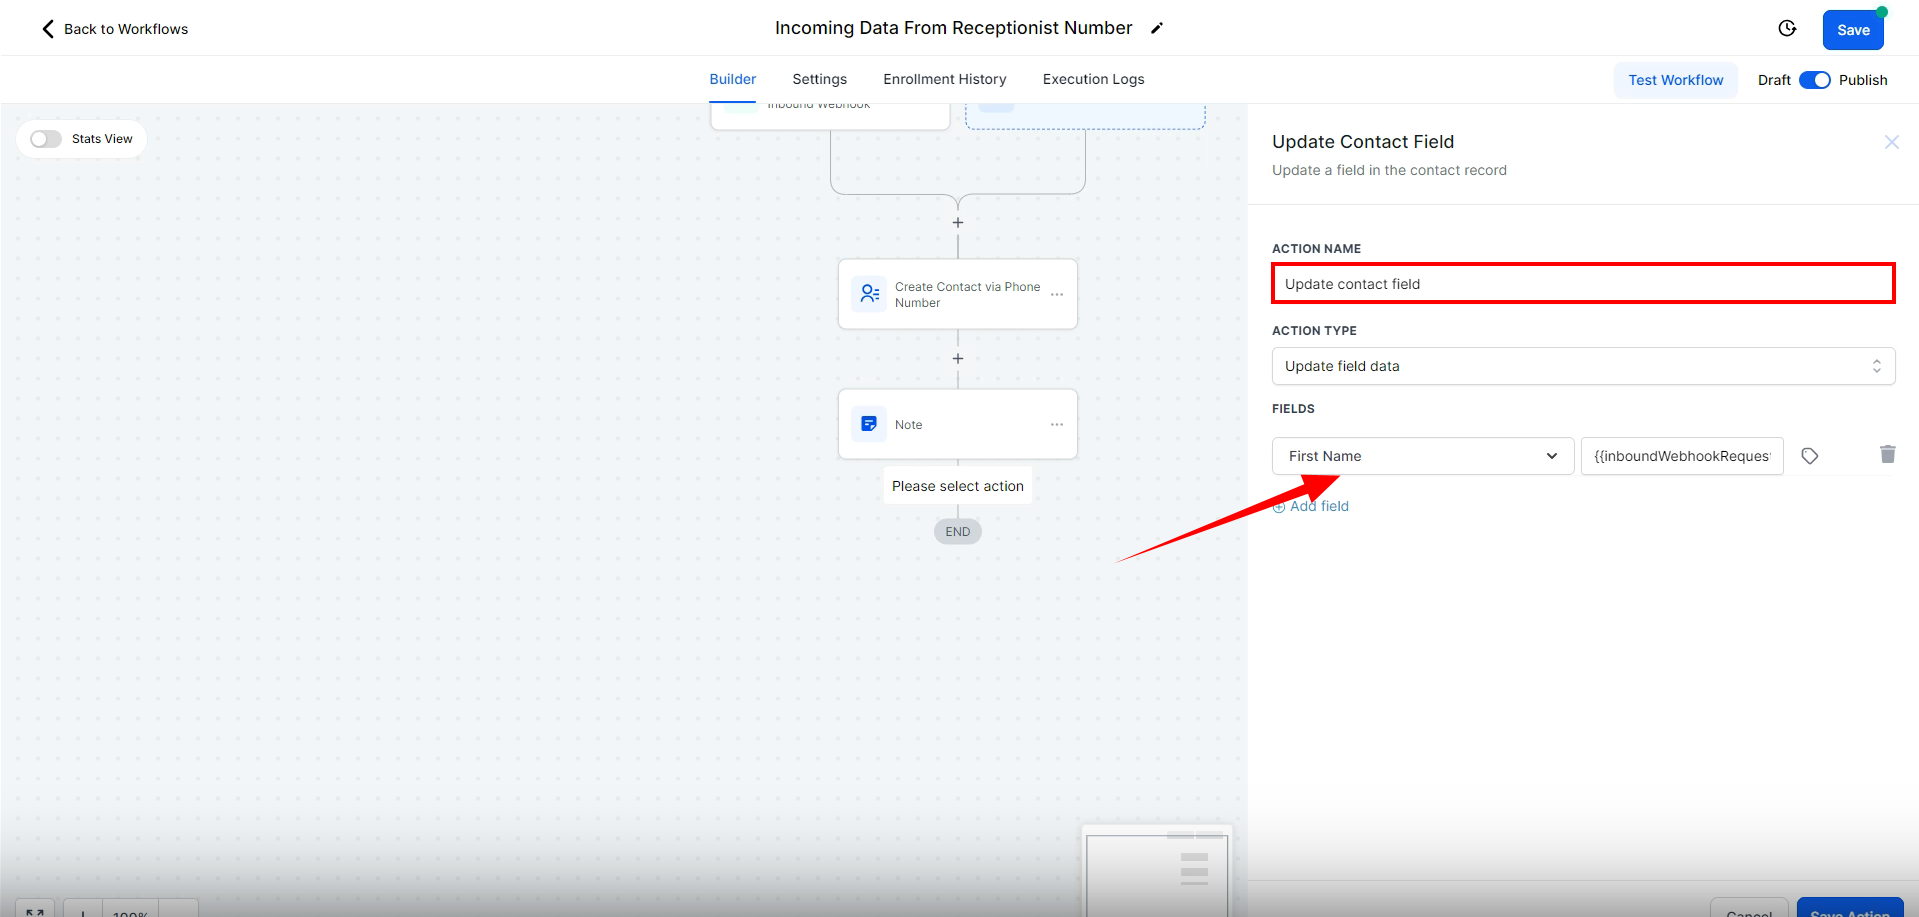
Step 8: Updating Contact Information #
When creating a contact in GoHighLevel:
- You can choose to update existing fields or leave them unchanged. For example, you might update the contact’s name only if the field is currently blank.
- Apply similar logic for other data points, such as Medicare status or appointment details.
Step 9: Customize Data Points and Automation #
GoHighLevel allows you to customize and expand the data points you collect during the call. This flexibility helps you design automation that fit your business workflow. You can:
- Add custom data points as needed.
- Use these data points to trigger additional automation, send emails, update contact records, or apply tags for segmentation.
Step 10: Finalize and Store Data #
After the data has been mapped and automation have been triggered:
- Store the data in notes, contact fields, or tags as required.
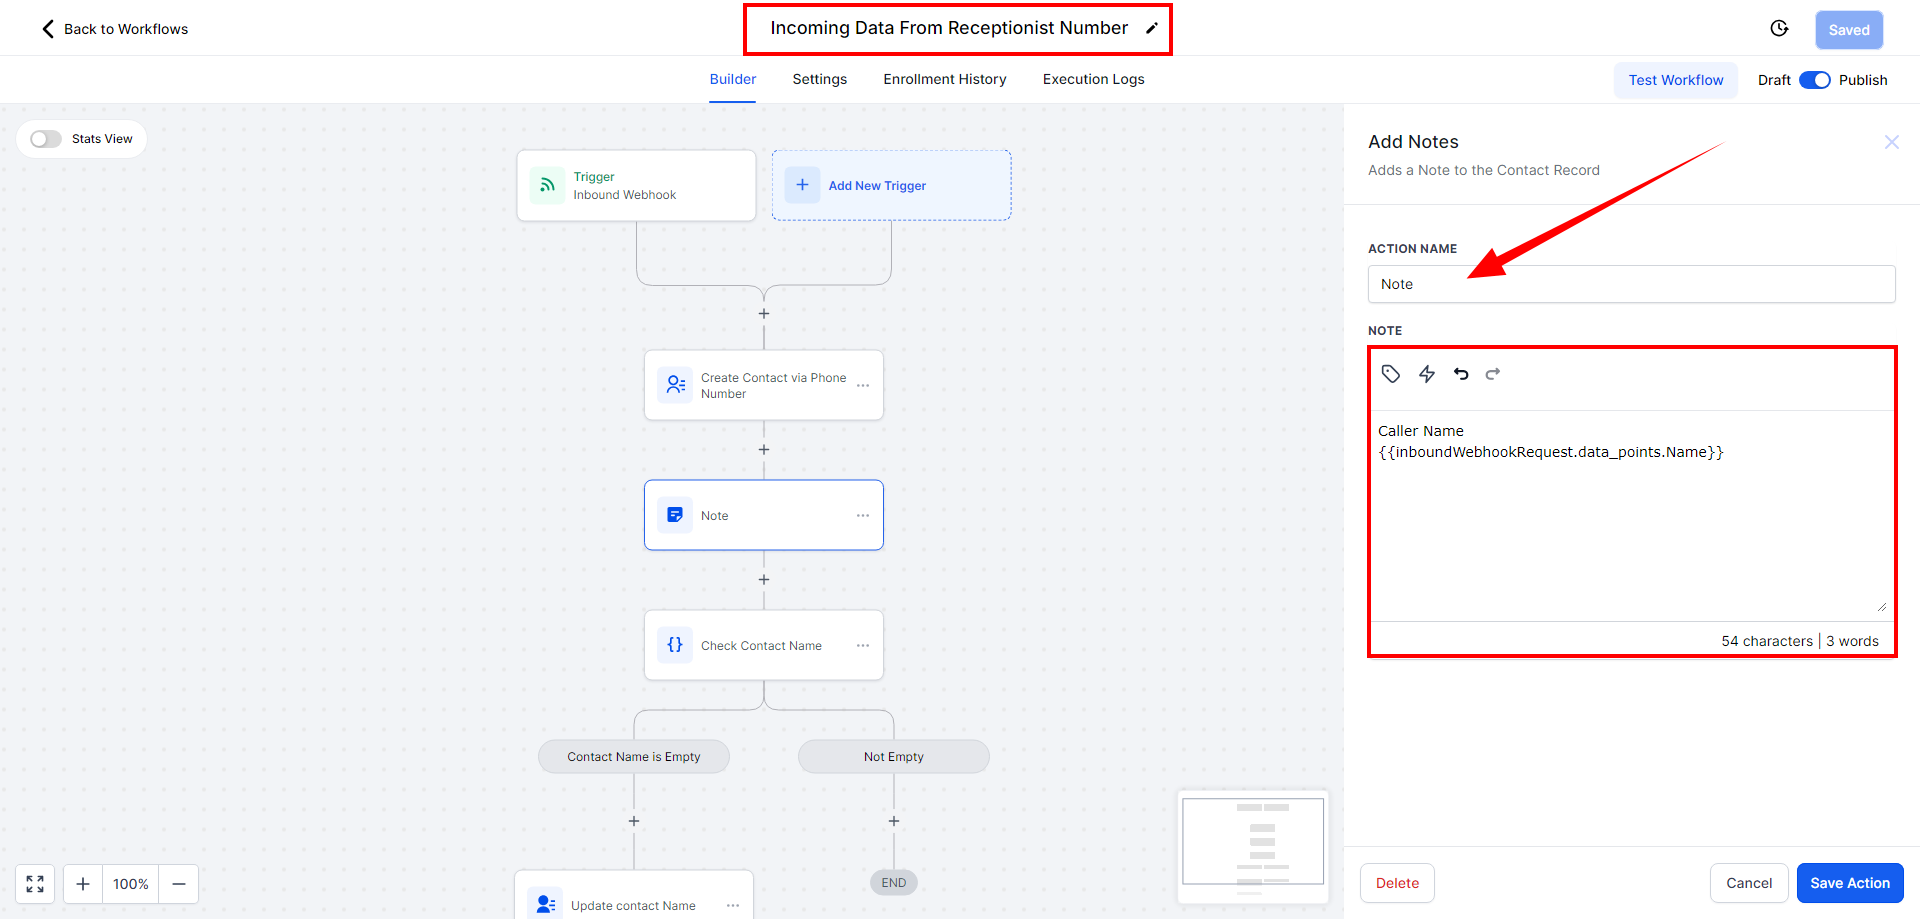
- If necessary, you can also update fields and add additional notes based on the call.
Example: You might tag a contact as “Medicare Interested” based on the data collected during the call, allowing for more targeted follow-ups.
Conclusion #
By following these steps, you can easily integrate data collected from your receptionist system into GoHighLevel and automate workflows based on that data. This process streamlines client management and helps you stay organized, saving time and effort in managing appointments and contact details. For more detailed information or assistance, be sure to check the official documentation or reach out to support. Happy automating!
Frequently Asked Questions (FAQs) #
- Can I use this guide with HubSpot or other CRMs? Yes, while this guide focuses on GoHighLevel, you can also use systems like HubSpot by integrating via Zapier.
- How do I set up the GoHighLevel inbound webhook? In GoHighLevel, navigate to Automation Settings and create an inbound webhook. Copy the provided Webhook URL and paste it into your receptionist system’s webhook settings.
- What kind of data is collected during receptionist calls? Data points such as the caller’s name, phone number, and any additional details depending on the conversation stage are collected and sent to GoHighLevel.
- What should I do if the webhook doesn’t work? Ensure the Webhook URL is correctly entered in your receptionist system and test the connection by making a call. If issues persist, check the Webhook Responses section in GoHighLevel for troubleshooting or contact support.


