
- Create a New Client Account
- Log In to the Account
- Step 1: Integrate GHL and Twilio Account
- Step 2: Set Up Company Details
- Step 3: App Settings and Timezone Settings
- Step 4: Configure Theme Settings
- Step 5: Add Tag or Import Tag From GHL
- Step 6: Add Credit Card Details
- Step 7: Buy a New Phone Number
- Step 8: Import Assistant
- Step 9: Create Tools and attach in AI Assistant
- Step 10: Create Calling Campaign
- Step 11: AI Caller Workflow Set-up in GoHighLevel
- Step 12: Add a Test Contact and Test First Call
Create a New Client Account #
Whenever a new client comes on board, the first step is to create their account.
-
- Go to account.affordablecare.ai.
- Enter the following details:
- Company Name
- Client Name
- Email Address
- Password
- Company Name
- Go to account.affordablecare.ai.
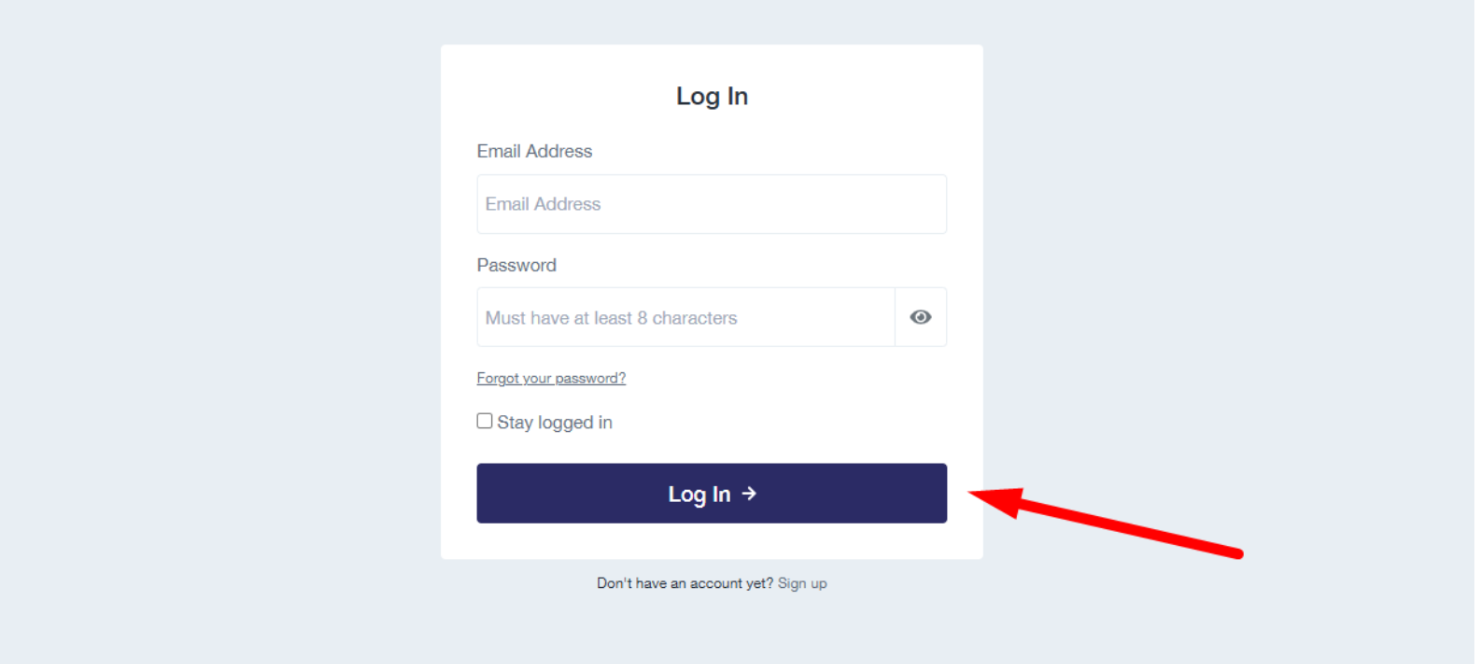
Log In to the Account #
After completing the signup process, the client account will be created successfully.
- Go back to account.affordablecare.ai.
- Enter the registered Email and Password.
- Click on Login.
- You will now be redirected to the client’s dashboard.
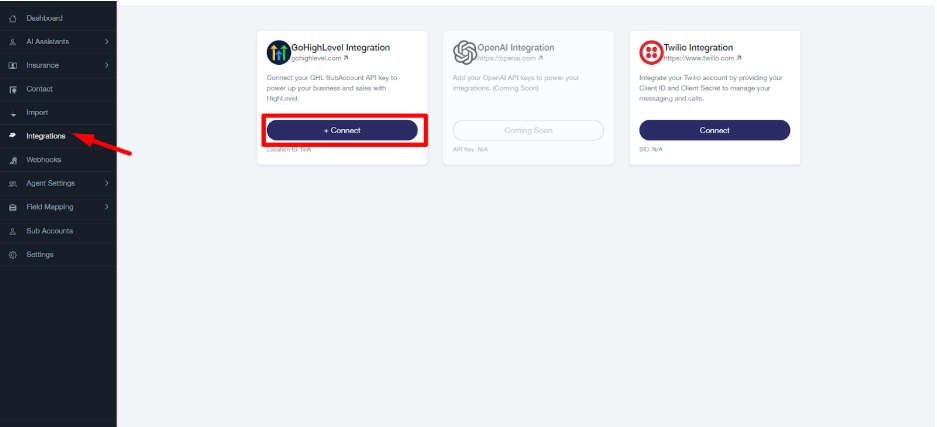
Step 1: Integrate GHL and Twilio Account #
Integrate GoHighLevel Account #
To integrate with GoHighLevel, follow these steps:
- Go to the Integration tab.
- Click on the Connect button under GoHighLevel.
- A window will open showing available HighLevel sub-accounts.
- Select the sub-account you want to integrate with this client’s account.
- Confirm the integration.
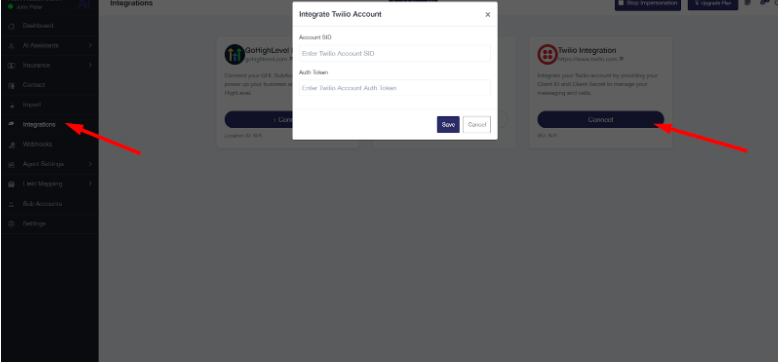
Integrate Twilio Account #
To enable calling and messaging features, you need to connect Twilio with the system.
- Go to the Integration tab.
- Click on Connect Twilio.
- Enter your Twilio Account SID and Auth Token.
- Click Save & Connect.
- Once connected, you can start purchasing numbers
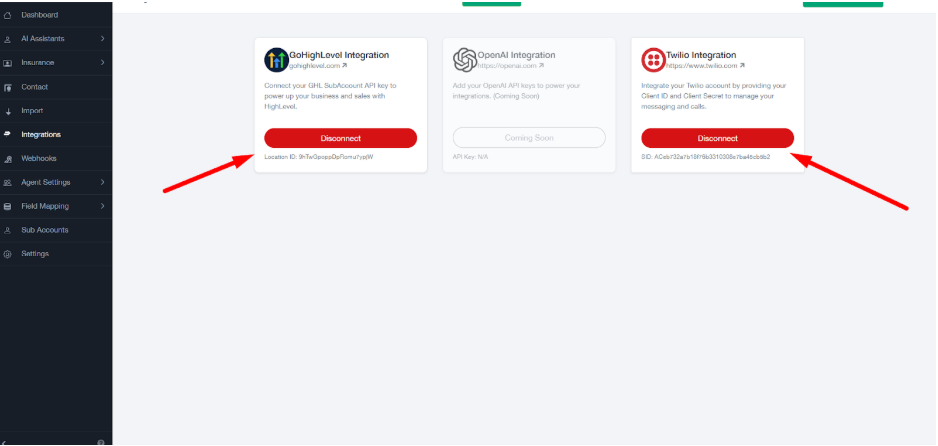
Verifying Integrations #
After connecting GoHighLevel and Twilio accounts, the system shows their connection status:
- The Connect button text changes to Disconnected and the button color turns red.
- Below the GoHighLevel button, you will see the HighLevel Location ID.
- Below the Twilio button, you will see the Account SID.
This confirms that the correct GoHighLevel sub-account and Twilio account are connected successfully.
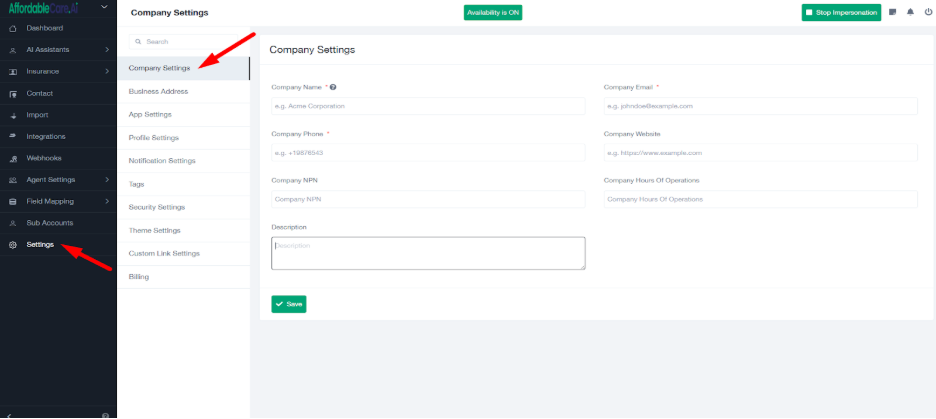
Step 2: Set Up Company Details #
The next step is to set up the company details.
- From the dashboard, go to the Settingstab.
- Click on Company Settings.
- Fill in the required fields:
- Company Name
- Email Address
- Phone Number
- Website URL
- NPN (National Producer Number)
- Hours of Operation
- Short Business Description
Save the changes to update company information.
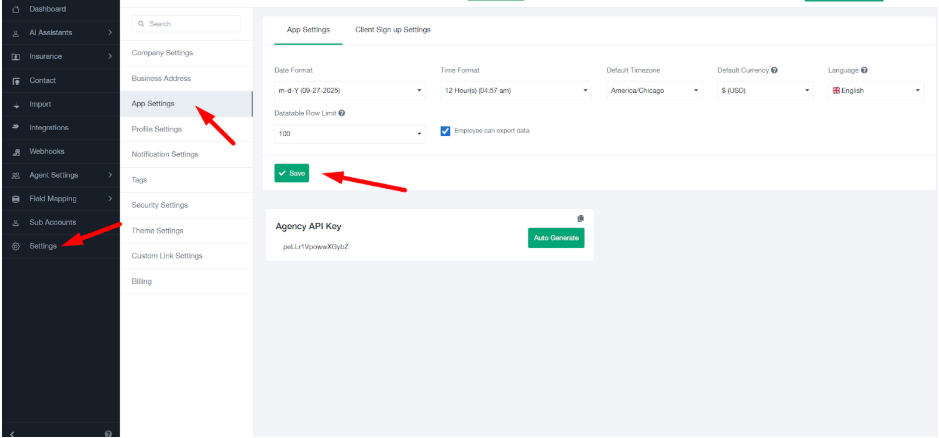
Step 3: App Settings and Timezone Settings #
The next step is to set up the app settings and timezone.
- From the dashboard, go to the Settings tab.
- Click on App Settings.
- Fill in the required fields:
- Date Format
- Time Format
- Tmezone
- Language
Save the changes to update company information.
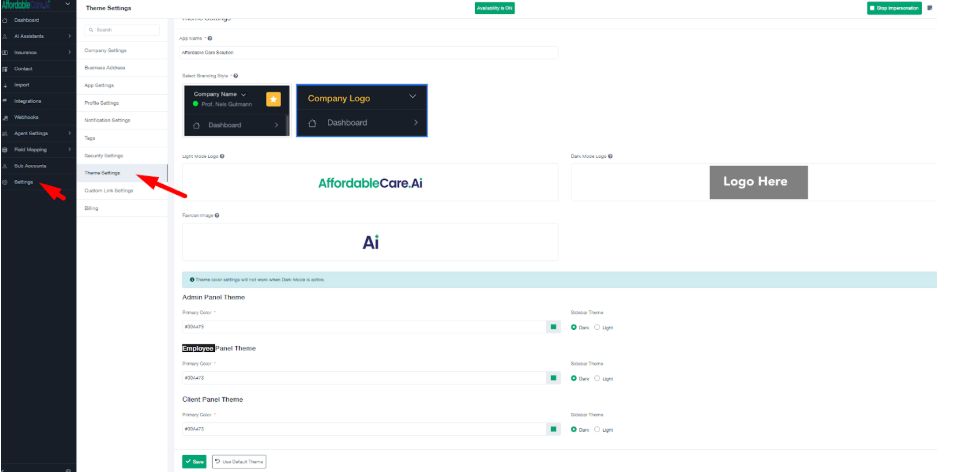
Step 4: Configure Theme Settings #
After setting up company details, the next step is to customise the theme.
- Navigate to the Settings tab.
- Click on Theme Settings.
- Upload your branding files:
- Light Mode Logo
- Dark Mode Logo
- Favicon Image
4. Customise theme colours for each panel by entering the colour codes:
- Admin Panel Theme Color
- Employee Panel Theme Color
- Client Panel Theme Color
5. You can choose Dark Mode or Light Mode depending on your brand preference.
6. Save the changes to apply your theme.
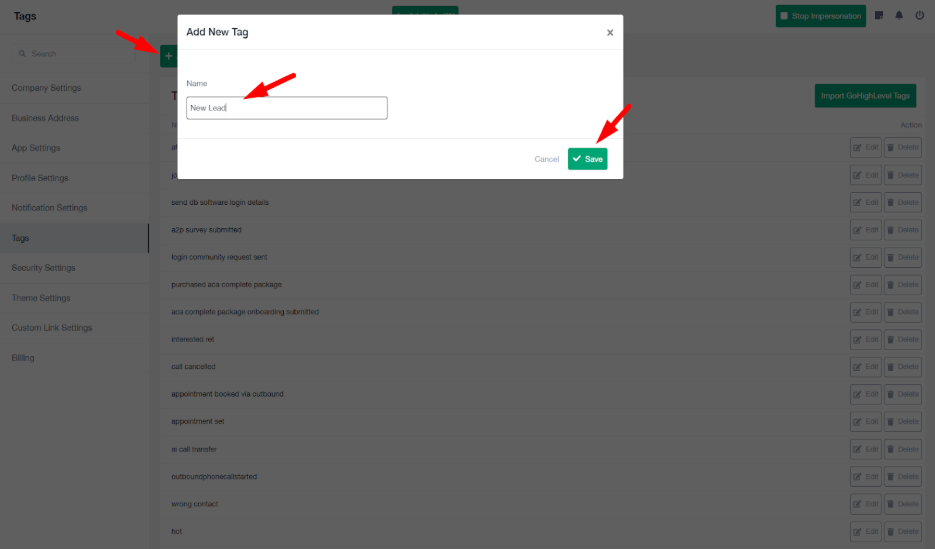
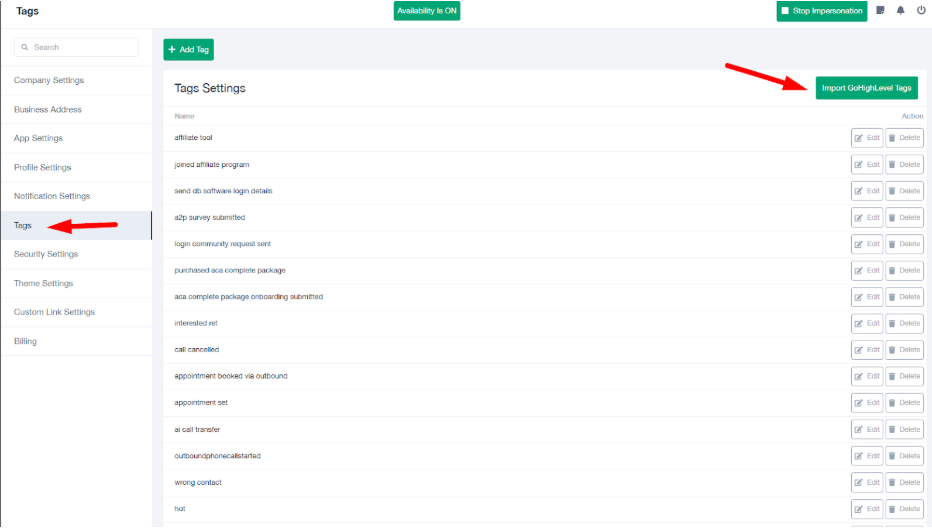
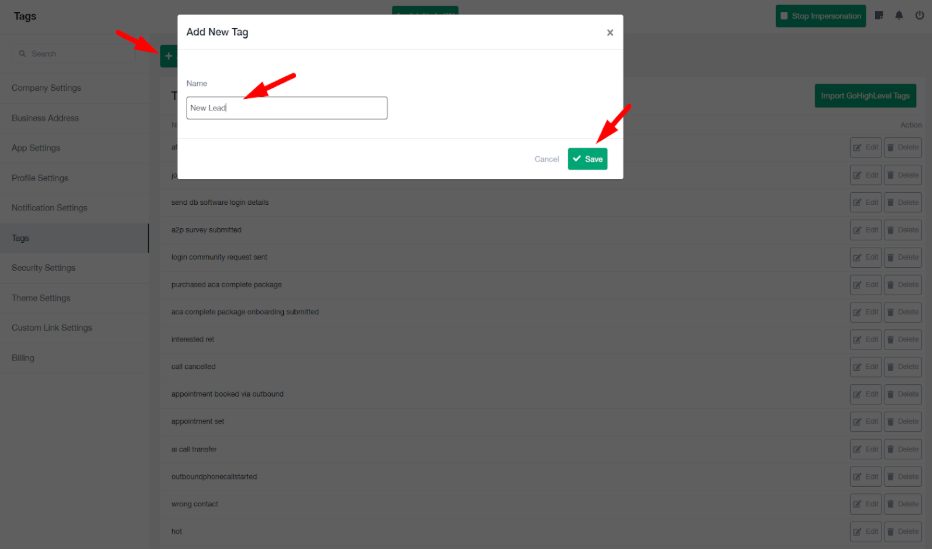
Step 5: Add Tag or Import Tag From GHL #
After setting up Theme settings, the next step is add tag or import tag from GHL.
Adding a New Tag #
- Go to the Tags section.
- Click on the Add Tag button
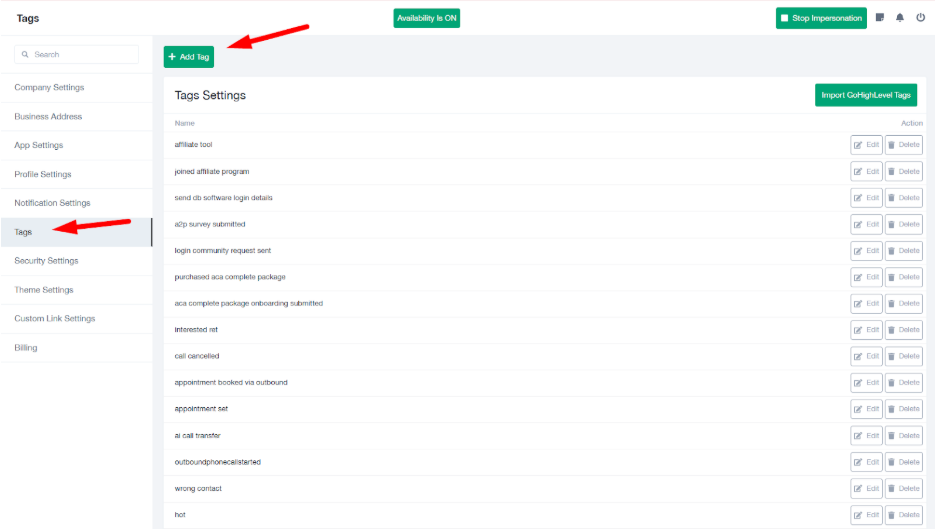
4. A field will appear where you can type the name of your new tag.
5. After entering the name, click on the Save button.
6. The tag will now be successfully added to your list, and you can start using it right away.
Import From GHL #
- In the same Tags section, click on the Import GoHighLevel Tags button.
- The system will automatically fetch all the tags from the connected GoHighLevel location.
4. A field will appear where you can type the name of your new tag.
5. After entering the name, click on the Save button.
6. The tag will now be successfully added to your list, and you can start using it right away.
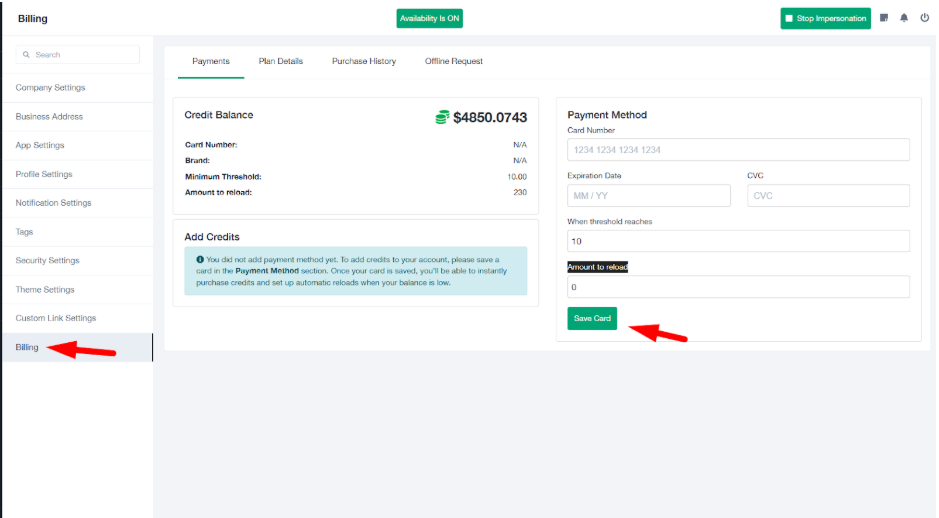
Step 6: Add Credit Card Details #
After that, the next step is to add credit card details.
-
- Go to the Billing in setting tab.
- Add Payment Method
- Go to the Billing in setting tab.
- Card Number
- Expiration Details
- CVC
- When the threshold reaches
- Amount to reload
After filling in all details, click on the Save or Add Card button.
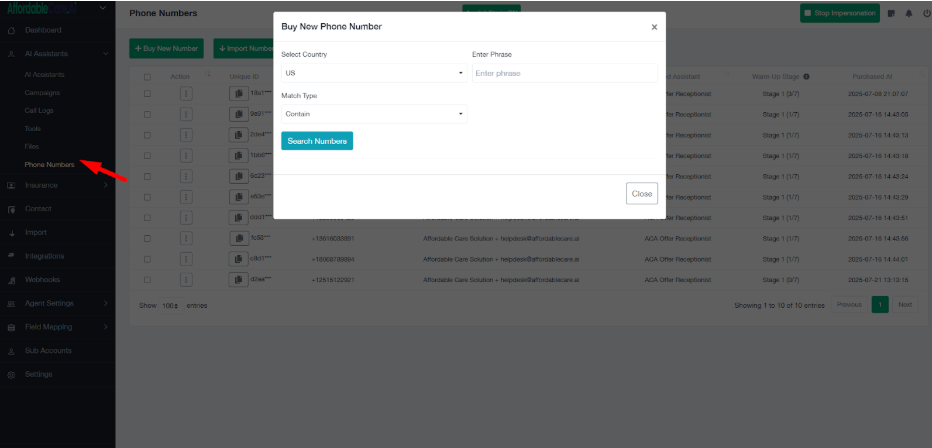
Step 7: Buy a New Phone Number #
To use your AI Assistant for calls, you need to purchase a phone number.
- Go to the Assistant tab.
- Click on the Phone Numbers section.
- Before buying a number, make sure your Twilio account is connected
- Once confirmed, click Buy New Number.
- Select the desired phone number from the available options.
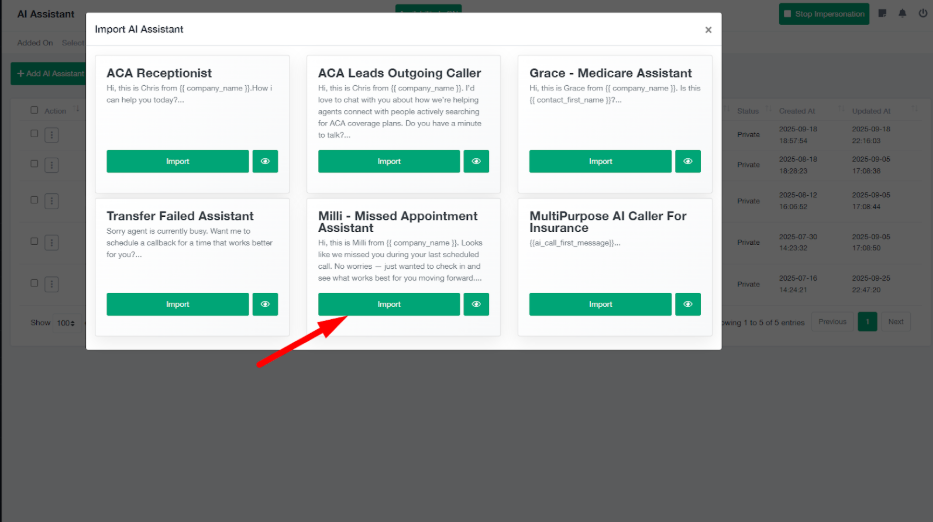
Step 8: Import Assistant #
- Go to the Assistant tab.
- Click on the Import Assistant button.
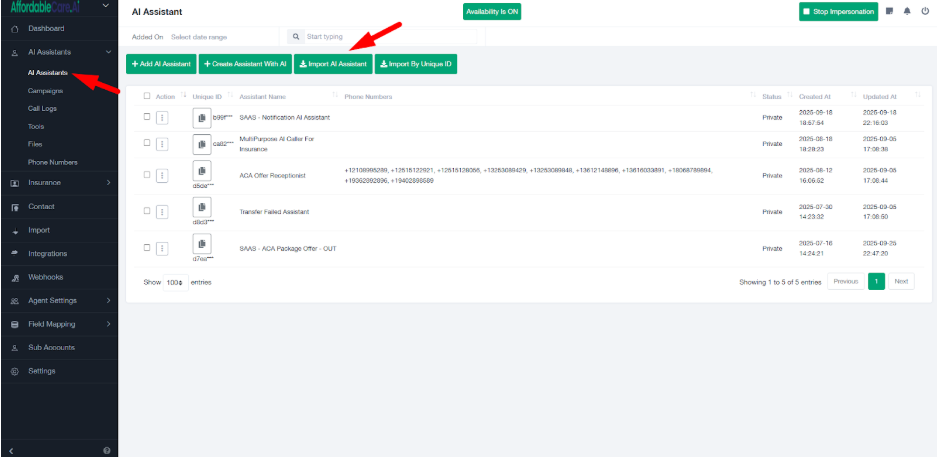
3. A list of available assistants will appear.
4. Select the assistant and click Import.
5. The assistant will be successfully added to your account, and you can start using or customizing it.
Step 9: Create Tools and attach in AI Assistant #
Tools for the AI Assistant #
What Are Tools in an AI Assistant?
- Tools are like features or skills that you give to the AI Assistant.
- Without tools, the assistant can only talk.
- With tools, the assistant can also take action while talking.
Why Are Tools Important?
- They make the assistant more useful.
- Instead of just answering questions, the assistant can also do work automatically (like booking, tagging, updating).
- Tools save time and effort by reducing manual tasks.
Role of Tools
- Tag Tool → Assistant can mark who is interested or not.
- Pipeline Tool → Assistant can move leads to the correct stage in sales.
- Appointment Tool → Assistant can book meetings directly.
- Transfer Tool → Assistant can connect the caller to a real human when needed.
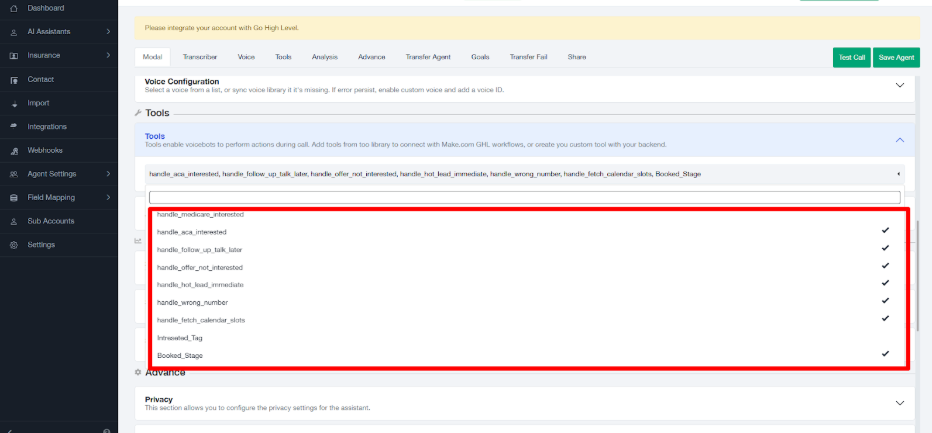
Select AI Assistant Tools #
After integrations are complete, the next step is to configure tools for your AI Assistant.
- Go to the AI Assistant tab.
- Choose the tools you want to attach to the assistant. Common options include:
- Add Tag – Automatically tag leads based on interactions.
- Booking Slot – Schedule appointments directly into the calendar.
- Update Pipeline – Move leads through sales stages automatically.
- Add Tag – Automatically tag leads based on interactions.
3. These tools are already available by default when an account is created. You just need to select them.Y
4. You can also create custom tools if needed, depending on your business workflow.
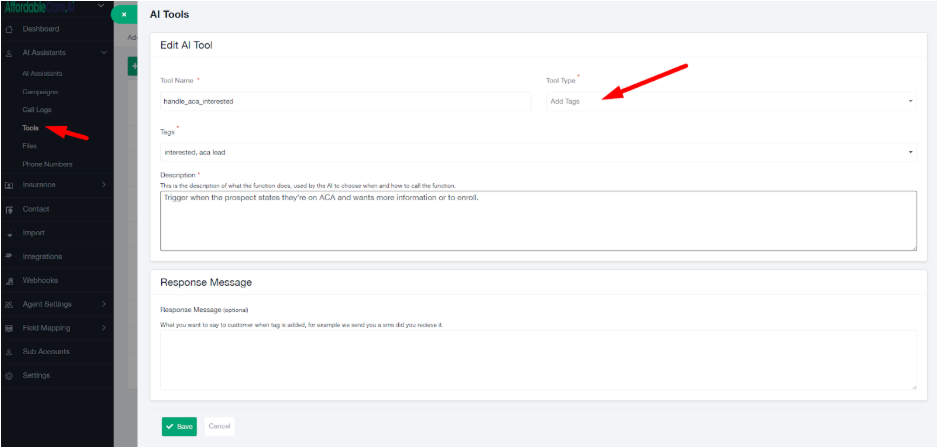
1. Tag Selection Tool #
Purpose: Automatically assign tags to leads based on their actions or responses.
How to Use:
- Provide a tool name (e.g., handle_aca_interested). Always use underscores instead of spaces.
- Fetch tags directly from GoHighLevel (GHL).
- Select the appropriate tag (e.g., “interested”, “aca lead”).
Trigger Point: Trigger when the prospect states they’re on ACA and wants more information or to enroll.
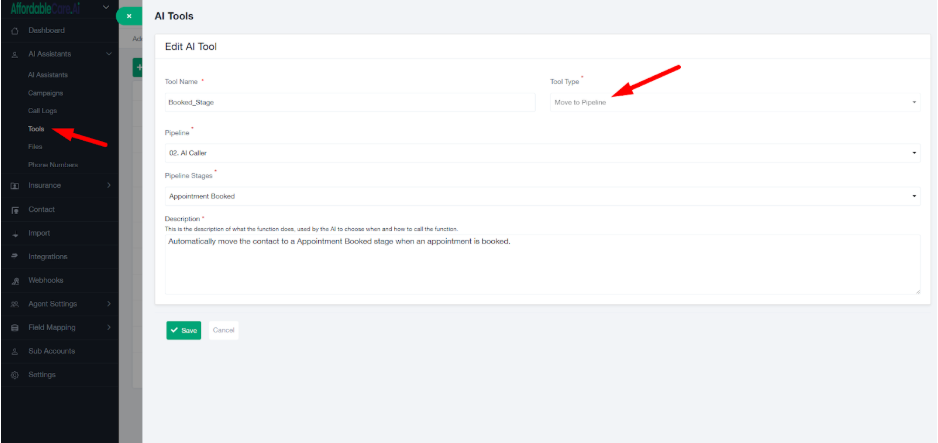
2. Moving to Pipeline Tool #
Purpose: Update the lead’s position in your sales pipeline automatically.
How to Use:
- Define the pipeline stages (e.g., booking_stage, followup_stage).
- Select the transition (e.g., move from Lead Stage → Follow-Up Stage, or Follow-Up → Appointment Scheduled).
Trigger Point: Automatically move the contact to a Appointment Booked stage when an appointment is booked.
3. Scheduling Appointment Tool #
Purpose: Allow users to book appointments directly through the AI Assistant.
How to Use:
- Select the calendar that you want to connect for scheduling.
- The AI Assistant will automatically fetch available time slots from this calendar.
- During the conversation, the assistant will suggest available slots and confirm the booking with the lead.
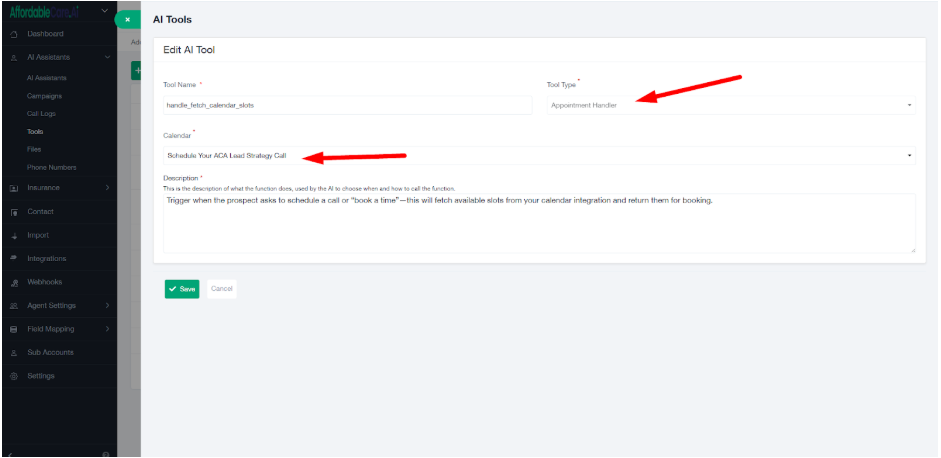
Trigger Point: Trigger when the prospect asks to schedule a call or “book a time”—this will fetch available slots from your calendar integration and return them for booking.
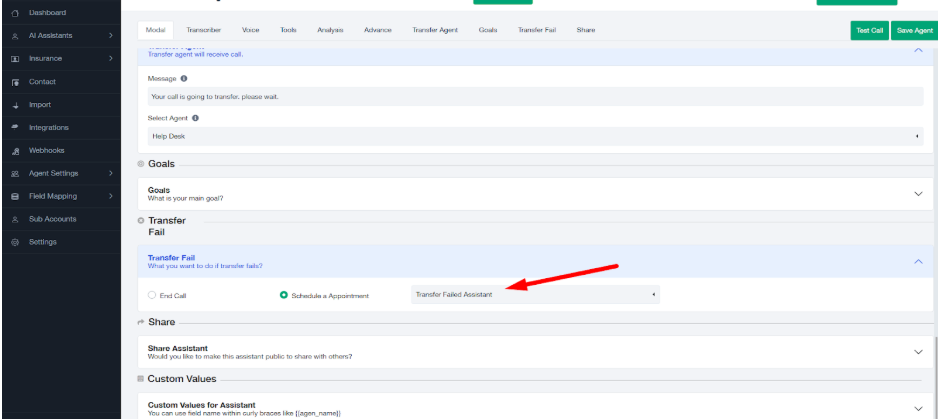
4.Configure Transfer Agent #
After selecting tools for your AI Assistant, the next step is to configure Transfer Agent settings.
- Scroll down below the tools section in the Assistant setup.
- Select the Primary Transfer Agent – this is the live agent (or phone number) where the call should be transferred if a lead says “I want to talk to a live agent.”

3. Configure a Transfer Fail Assistant – in case the transfer to the primary agent fails, the call will be automatically redirected to the selected assistant.
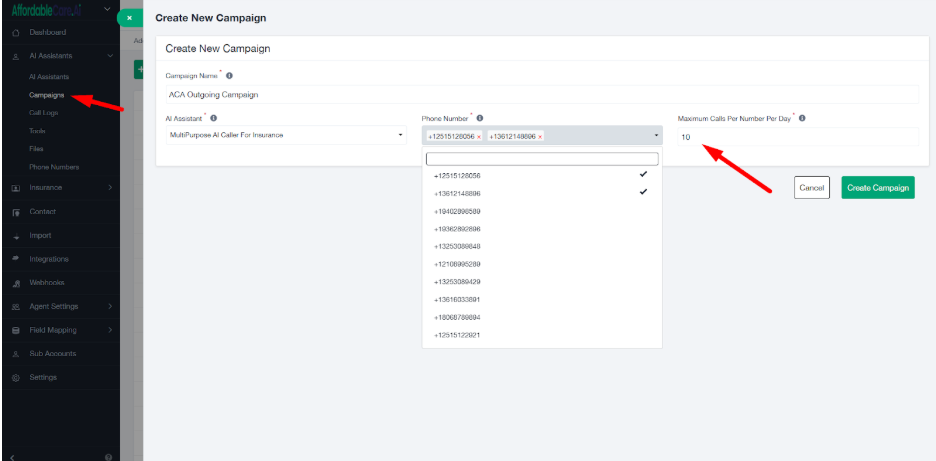
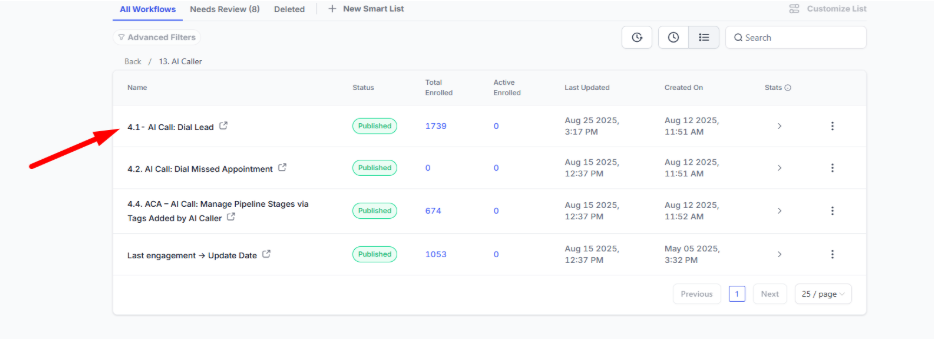
Step 10: Create Calling Campaign #
The next step is to create a campaign for outgoing calls.
- Go to the Campaigns tab.
- Click on Create New Campaign.
- Enter the campaign details (e.g., campaign name ).
- Select the phone numbers you purchased earlier to use for outgoing calls.
- Assign the campaign to the relevant AI Assistant.
- Set the Maximum Calls Per Number Per Day to control how many calls each number can make daily.
- Save the campaign.
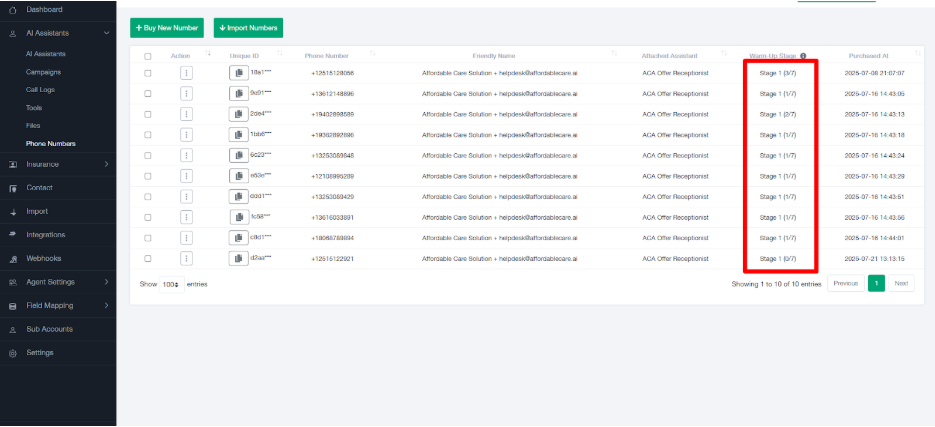
Number Warm-Up Process #
To avoid numbers being flagged as spam, follow the warm-up process. As each stage updates, you can safely increase the number of daily calls according to that stage.
Stage 1 → 10 calls per day for 7 days
- After completing 7 days of 10 calls/day (within the last 30 days or during the first 7 days), the number automatically moves to Stage 2.
Stage 2 → 20 calls per day for 7 days
- At this stage, you can safely increase daily calls up to 20.
Stage 3 → 30 calls per day for 7 days
- At this stage, daily calls can be increased to 30.
After completing Stage 3, each number can safely handle 40 calls per day.
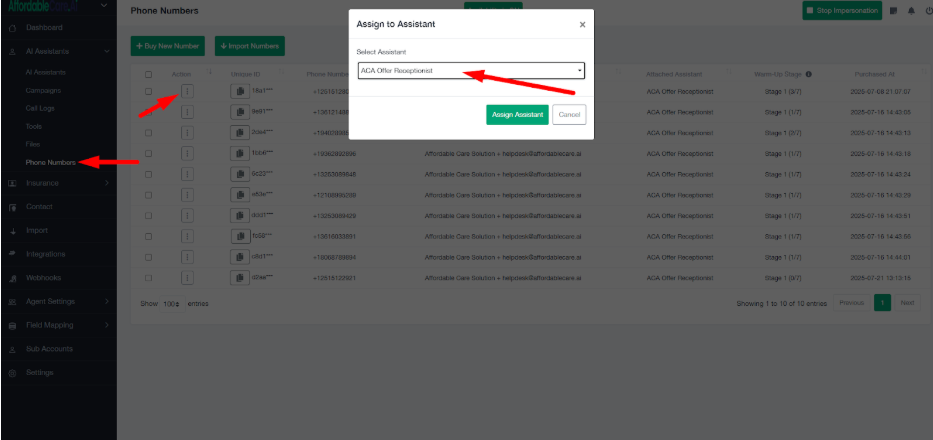
Assign Number to Receptionist Assistant #
The Receptionist Assistant is responsible for handling incoming calls, so you must assign it a phone number.
- Go to the Phone Numbers tab.
- From the list of purchased numbers, select the number you want to connect with the Receptionist Assistant.
- In the number settings, choose Assign to Assistant.
- Select the Receptionist Assistant from the dropdown.
- Save the changes.
Step 11: AI Caller Workflow Set-up in GoHighLevel #
After assigning numbers to the Receptionist Assistant, you now need to continue the setup inside GoHighLevel (GHL).
- Log in to your GoHighLevel account.
- Navigate to Automation → Workflows.
Locate the folder named AI Caller
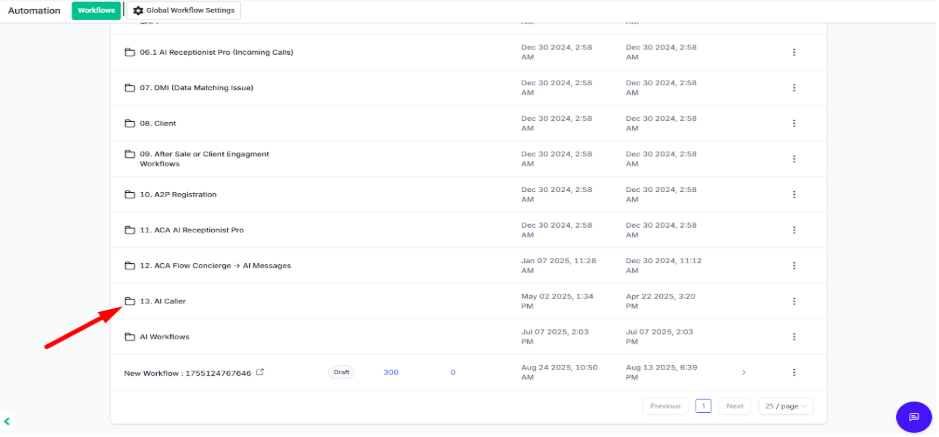
- Open the Outgoing Caller Workflow from this folder.
Update Webhook Action in Outgoing Caller Workflow #
Once you open the Outgoing Caller Workflow inside GoHighLevel, you need to configure the webhook action so that it sends the correct client details to the AI Caller.
- Inside the Outgoing Caller Workflow, locate the Webhook Action.
- Click on it to open the configuration.
- Update the Custom Data Fields according to the client’s details:
- ai_bot_name → Example: Ava, Chris, Sarah
- ai_call_business_niche → Example: Life Insurance, Medicare, ACA, Dental
- ai_call_goals_for_leads → Example: Qualify the lead by confirming their name, checking current coverage, gauging interest in final expense plans, collecting age, zip code, smoker status, and budget, then connect to a licensed agent or schedule a callback if eligible.
- ai_call_first_message → Example:
“Hi, this is Chris calling from Immediate Burial Insurance. You recently showed interest in Final Expense Life Insurance. I just wanted to quickly check — is now a good time to talk?”
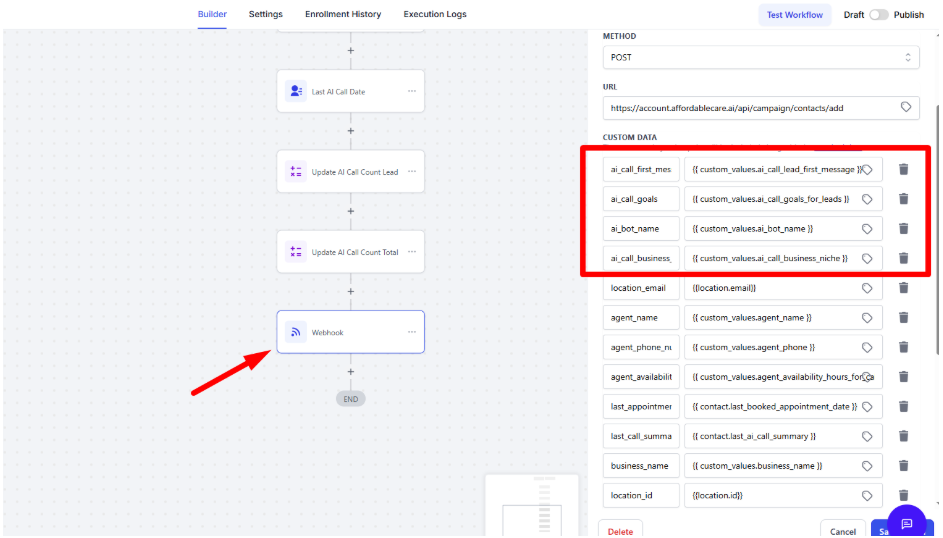
Note: In the ai_call_first_message, you must always update the Bot Name, Business Name, and Business Niche to match the client’s details.
Note: You can enter values directly (plain text) or use Custom Values from GoHighLevel.

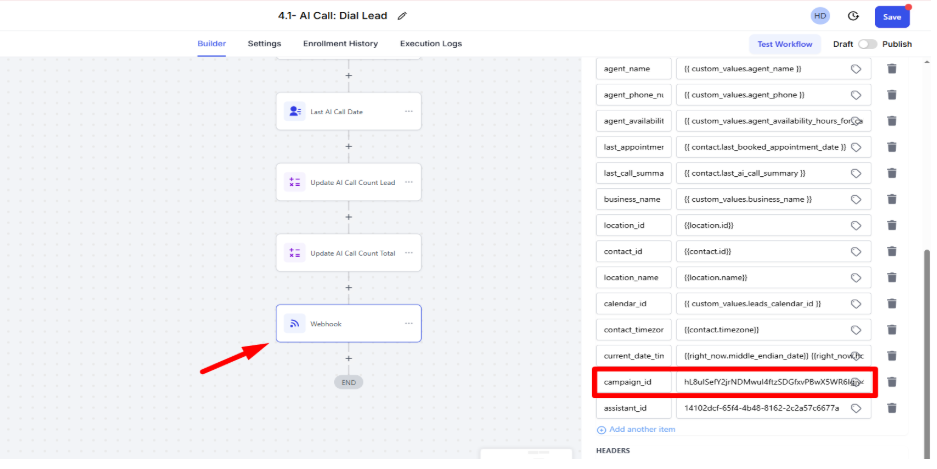
Add Campaign ID in Webhook Action #
- In the Webhook Action of the Workflow, scroll to the Campaign ID field.
- Go to your SAAS Account → Campaigns.
- Copy the Campaign ID of the campaign you want this workflow to trigger.

4. Paste the ID into the Campaign ID field in the webhook action.
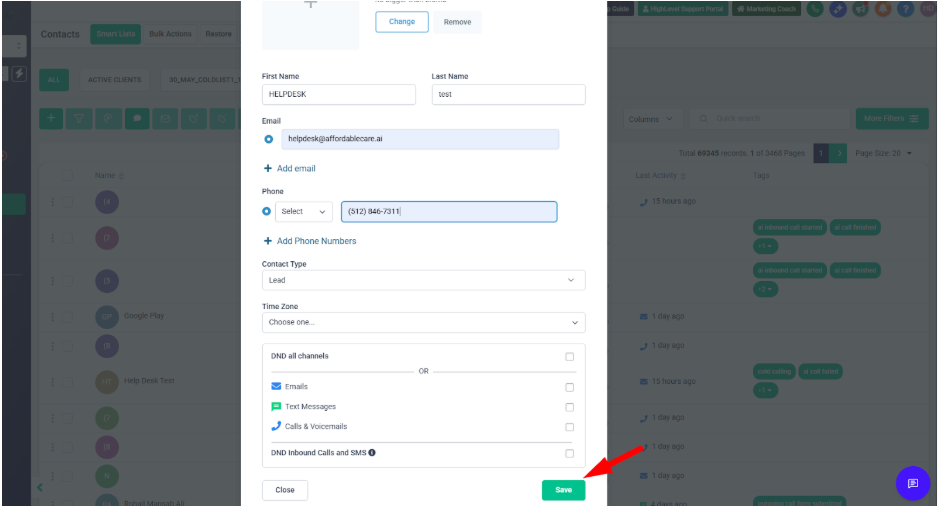
Step 12: Add a Test Contact and Test First Call #
Add a Test Contact
#
-
- Go to the Contacts section in GHL
- Click Add Contact.
- Enter sample details (use your own phone numberl so you can receive the test call):
- Go to the Contacts section in GHL
- First Name / Last Name → e.g., Test Contact
- Phone Number → your personal/test number
- Email Address → your email (optional)
4. Click Save.
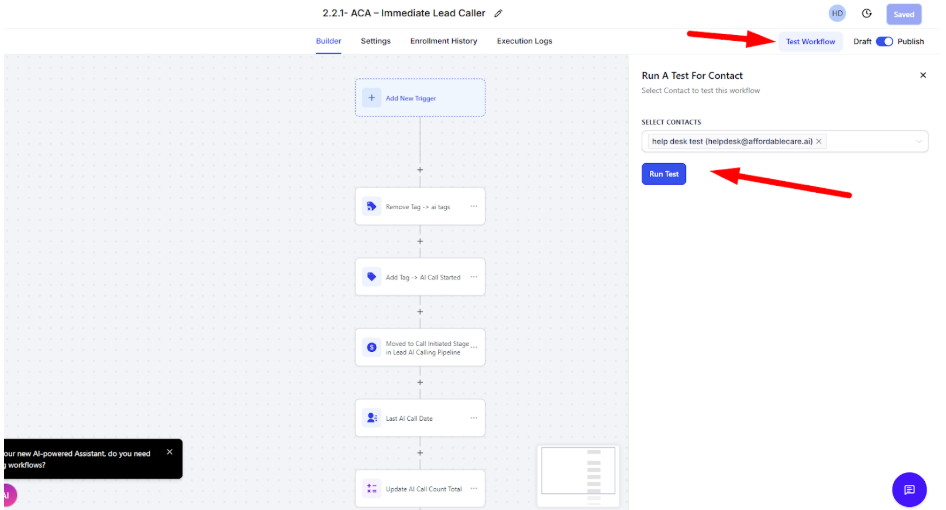
Test a Call #
- Go to your Workflow / Automation where the AI Caller is connected.
- Just Click on test workflow and add test contact which we have created.
- The AI Caller should now make the first test call to your number.
Improve the Prompt #
- Listen carefully to how the AI speaks and responds during the test call.
- If It doesn’t achieve your goal (e.g., tone, clarity, collecting details, booking appointment).
- Go back into your AI Assistant Prompt / Script settings.
- Update the prompt
- Save changes and re-run another test call.


