
Introduction #
As an ACA Insurance Agent or agency owner, creating a fully branded experience enhances professionalism and builds client trust. Our platform makes it easy to white label your account, allowing you to customize the platform’s appearance to reflect your agency’s unique identity.
In this step-by-step guide, you’ll learn how to:
- Change your company logo for both Light and Dark modes
- Upload a favicon (the small browser tab icon)
- Choose your branding style (company name or logo display)
- Customize theme colors for admin, employee, and client portals
This ensures that your entire team and clients see a consistent and polished brand experience when interacting with your platform.
Step 1: Access the Theme Settings #
- Log in to your account on the platform.
- In the left-hand navigation menu, select Theme Settings.
- You’ll find this under the Settings section.
- Or, use the search bar to locate Theme Settings directly.
- You’ll find this under the Settings section.
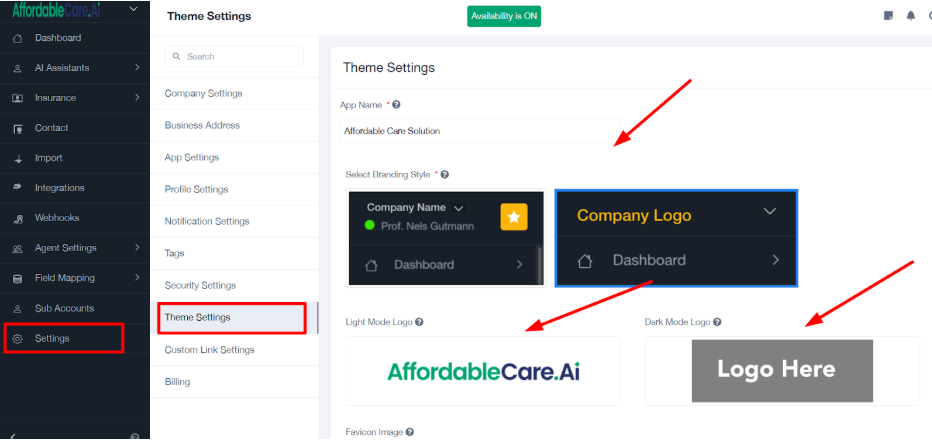
Step 2: Set Your App Name #
At the top of the Theme Settings page:
- Enter your preferred App Name — typically your agency’s name or a program name you manage.
Example: “Premier Insurance Agency”
This name will appear throughout the platform where the app name is displayed.
Step 3: Choose Your Branding Style #
In the Select Branding Style section:
- Choose between displaying:
- Company Name on the dashboard
- Company Logo on the dashboard
- Company Name on the dashboard
Tip: If your logo is recognizable, selecting Company Logo provides a stronger visual identity.
Step 4: Upload Light Mode and Dark Mode Logos #
Customize your portal to look great in all display modes:
- Light Mode Logo:
- Upload a version of your logo that looks best on light backgrounds.
- Upload a version of your logo that looks best on light backgrounds.
- Dark Mode Logo:
- Upload a logo designed for dark backgrounds (typically lighter colors).
- Upload a logo designed for dark backgrounds (typically lighter colors).
Upload Instructions:
- Click the upload box for each mode.
- Select your logo file from your computer.
- For best results, use high-resolution PNG files with transparent backgrounds.
Step 5: Upload a Favicon Image #
A favicon is the small icon shown in the browser tab when the portal is open.
To upload your favicon:
- Locate the Favicon Image section.
- Click to upload a square image file.
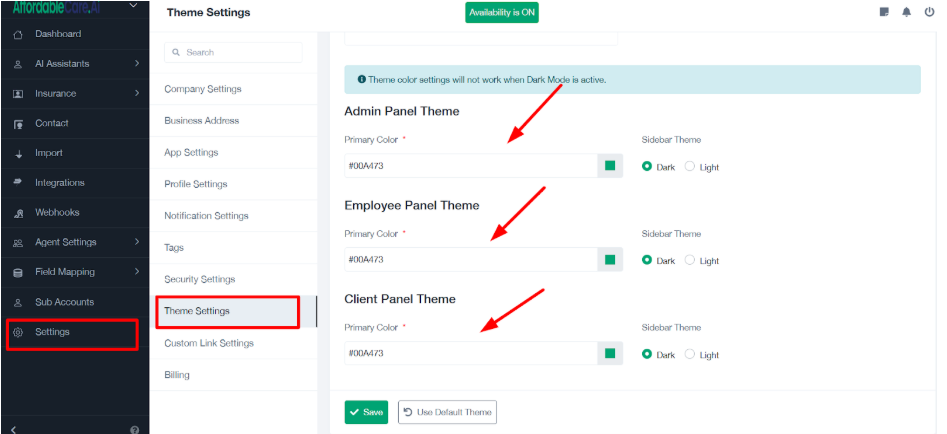
Step 6: Customize Theme Colors #
You can personalize the visual theme for:
- Admin Panel
- Employee Panel
- Client Panel
For each panel:
- Primary Color:
- Enter a HEX color code (e.g., #123456) or use the color picker.
- Enter a HEX color code (e.g., #123456) or use the color picker.
- Sidebar Theme:
- Select either Dark or Light to set the sidebar’s appearance.
- Select either Dark or Light to set the sidebar’s appearance.
⚠️ Note: Theme color customizations do not apply when Dark Mode is enabled overall.
Step 7: Save Your Changes #
Once all your branding elements are in place:
- Click the Save button at the bottom of the screen.
- Optionally, click Use Default Theme to reset to the original platform style.
Practical Example #
Let’s say your agency, Premier Insurance Agency, recently updated its branding:
- You upload the new logo for both Light and Dark modes.
- Add a custom favicon featuring your new brand icon.
- Update the primary colors across the Admin, Employee, and Client panels to match your brand palette.
Now, everyone who accesses your platform will see your refreshed branding — creating a consistent, professional experience.
Conclusion #
Branding your platform through the Theme Settings helps reinforce your agency’s identity across all user touchpoints. With just a few quick steps, you can achieve a fully white-labeled solution tailored to your business.


